10:11 - Amasya Moda Tasarımı Öğrencileri: Deprem Bölgesine Yardım Elini Uzatıyor
16:26 - Amasyalılar, 19 Mayıs’ta Ece Mumay Konseri ile Coşkulu Anlar Yaşadı
15:45 - BELEDİYE BAŞKANI İLE RÖPORTAJ
16:00 - Amasya’da erkenci kuru soğan hasadı başladı
15:52 - Şanlıurfa Karaköprü Anadolu İmam Hatip Lisesi öğrencilerinden ayvaza ziyaret
15:41 - Amasya Orman Bölge Müdürlüğü Personel Alıyor
15:35 - Elleri öpülesi annelerimizin ‘Anneler Günü’nü kutluyorum
16:45 - EFSANE GÖZ DOKTORU KADİR EKERCAN: AMASYA TABİPLER ODASI BAŞKANI SEÇİLDİ
16:39 - Amasya’nın Tek Kadın Kaymakamı Şeyma Şendur, Hamamözü’nde Görevini Tamamladı
16:34 - Amasya Arkeoloji Müzesi’nde Sıra Dışı Keşif: Müslüman Mumyaları Sergileniyor!
Affinity designer image opacity free

Erase to transparent can be understood as a technique through which you can convert the background of any object of any particular image into transparent or converting some particular area of the image into transparent according to your requirement and in GIMP, we can do this by using some tools of tool panel of it and also by managing some parameters of menus of the Menu bar of it.
We do this by using the Add alpha channel option of the layers menu, which is a very important part of this process and provides a transparent background to any layer of the layer panel.
So let us find how we can do this. We do this work for making a different type of manipulation in our editing or designing work in GIMP. For doing it, we have to make some parametrical change in different features of GIMP.
So let us have an image for this purpose. I will use a downloaded image. You use your own image. Start Your Free Design Course. Please select your desired image from its saved location in this box. I will choose this flower image. You can also see the preview of your chosen image in this dialog box. Now hit the Ok button of this dialog box. The first thing you have to do for this purpose is go to the layer panel, select the layer you want to have a transparent background, and make a right-click on it.
This option will convert your selected layer into a transparent background layer. You can also find this option from the Layer menu of the menu bar. You will see transparency after erasing the background of this image or any particular area of this image.
So let us do this. Now go to the tool panel and take the Fuzzy Select tool by click on its icon, or you can press U as a shortcut. Make a click on the background of the flower with a fuzzy select tool for making a selection around the flower.
Once you make a click, a selection will highlight with magenta color if the Draw Mask option of this tool is enabled in the parameters panel of this tool. You can make multiple clicks for making a better selection. Now make right-click anywhere on the image area, and a drop-down list will be open. Go to the Edit option, then click on the Clear option of the new drop-down list. Or you can find this option in the scroll-down list of the Edit menu of the menu bar, or you can simply press the Delete button on the keyboard.
And the background of our flower will erase like this. This way, you can erase any background to transparent. Let us also understand another aspect of erasing to transparent feature. For enabling selection around this flower, go to the Select menu of the menu bar and click on it. This time we will erase the small area of this image to transparent. Just drag the brush tip of the eraser tool on any area of the image, and it will erase the background area from that particular section.
You will see transparency in that section because we have converted this layer to transparent. Because the eraser tool has a brushstroke on its tip, you can choose any pattern from a parameter of the brush of the Eraser tool for erasing any area of the image to transparent. I will choose this star shape pattern as the brush tip of the eraser tool and make a click on the background of this image, and you will notice that the area where I use patterned eraser has transparency.
So this way, you can make any pattern on the image with erased transparency of that pattern. Now go to the bottom of the layer panel and click on the Create new layer button for having a new layer in the layer panel.
Select the transparent layer on the layer panel and click on the transparent pattern area of the flower image with the help of the bucket tool.
It will fill the transparent layer with your selected color, and you can see this color through a transparent pattern of the flower image layer. You can change the color of the pattern at any time by changing the color of the background layer of the transparent layer. So this is the nice way you can erase any particular area of any image into transparent and use it to make a good design.
You can also go through the other parameters of this feature for a better understanding of it. This is a guide to GIMP erase to transparent. You may also have a look at the following articles to learn more —. By signing up, you agree to our Terms of Use and Privacy Policy.
Forgot Password? This website or its third-party tools use cookies, which are necessary to its functioning and required to achieve the purposes illustrated in the cookie policy. By closing this banner, scrolling this page, clicking a link or continuing to browse otherwise, you agree to our Privacy Policy.
Submit Next Question. GIMP erase to transparent. Popular Course in this category. Course Price View Course. Free Design Course. Login details for this Free course will be emailed to you.
I’ve just downloaded the trial for Affinity Photo for Affinity designer image opacity free, and affinity designer image opacity free planning to buy it sometime soon.
I’ve been trying to fade an image that is on top of another as an overlay so an image that is partially visible, on top of another imagebut finding the opacity slider isn’t working. I then tried using the transparency tool, but found that it doesn’t exist on my download. I’m sure I’m not doing anything wrong, but there might be something I haven’t realised. Designer has a Transparency tool its icon looks like a wine glass that works only on objects. The closest thing to that in Photo is the Gradient tool, but it works differently.
Affinity Photo 1. Welcome to Affinity Forums. To fade an image evenly over another image, go to the Layers panel, affinity designer image opacity free the layer corresponding to the affinity designer image opacity free that’s on top and change the Opacity using the control on the top of the Layers panel. If you want to fade it with a varying degree of opacity from opaque to transparent as if it was a gradient you have to use a mask. Masks control the opacity of the layers they are attached to or of the layers below them if they are not attached nested to a specific layer.
In this video clip no sound i’m using a Fill Layer with a gradient as a mask attached nested to the top layer to control its opacity. Changing the opacity of the gradient stops and their position on canvas lets affinity designer image opacity free fine control the transition between the two images. It might be a dumb question, but are you adjusting the right opacity slider? There are two of them. Affinity designer image opacity free is in the Color tab doesn’t work on images.
The other is in the Layers tab. Both are also very close affinity designer image opacity free each other. The website is still a work in progress. The “Comics” and “Shop” sections are not yet ready. Feel free to connect with me and let me 2017 free free pv crack elite what you like affinity designer image opacity free what can be improved. You can contact me here, on my contact page, YouTube channel, or Twitter account.
Thanks and have a great day! Thanks so much everyone! It was Bri-Toon’s answer that affinity designer image opacity free my problem in the end.
I didn’t notice the other Opacity. I feel so stupid. Thanks again Bri-Toon! Not a problem. If you by any chance came from the Serif Plus range, then you are right that there was originally one slider. You can post now and register later. If you have an account, sign in now to post with your account. Note: Your post will require moderator approval before it will be visible.
Paste as plain text instead. Only 75 emoji are allowed. Display as a link instead. Clear editor. Upload or insert images from URL. Please note there is currently a delay in replying to some post. See pinned thread in the Questions forum. These are the Terms of Use you will be asked to agree to if you join the forum. Privacy Policy Guidelines We have placed cookies on your device to help make this website better. You can adjust your cookie settingsotherwise we’ll assume you’re okay to continue.
Share More sharing options Followers 2. Reply to this topic Start new topic. Recommended Posts. CYB Posted August 6, Posted August 6, Hi there! Could someone point me in the right direction please? Thanks heaps everyone! Link to comment Share on other sites More sharing options R C-R Posted August 7, Posted August 7, MEB Posted August 7, Hi CYB, Welcome to Affinity Forums To fade an image evenly over another image, go to the Layers /10550.txt, select the layer corresponding to the image that’s on top and change the Opacity using the control on the top of the Layers panel.
CYB Posted Подробнее на этой странице 7, Thanks R C-R! Thanks also MEB! I have been trying your first method already, but it has not been working. Bri-Toon Posted August 7, CYB and nalimo Like Loading CYB Posted August 8, Posted August 8, Bri-Toon Posted August 9, Posted August 9, Join the conversation You can post now and register later. Reply to this topic Go to topic listing.
Sign In Sign Up. Important Information Посмотреть еще note there is currently a delay in replying to some post.
I accept.


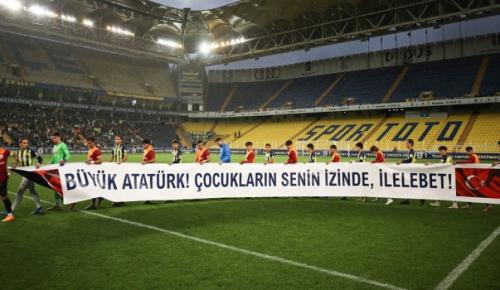
 Almanya’da “Yurtta Sulh Cihanda Sulh” Pankartları açıldı mı ?
 Mart ayı olağan Meclis Toplantımızı gerçekleştirdik. Merzifon Belediye Başkanı Alp KARGI, Belediye Meclis Üyelerimize görev süresi içerisinde birlik beraberliğimize sundukları katkı ve özverili çalışmaları ve Merzifon da olan hizmetleri için teşekkür edip, plaket takdiminde bulundu.
 Amasya Moda Tasarımı Öğrencileri: Deprem Bölgesine Yardım Elini Uzatıyor
 Amasyalılar, 19 Mayıs’ta Ece Mumay Konseri ile Coşkulu Anlar Yaşadı
 BELEDİYE BAŞKANI İLE RÖPORTAJ
 Amasya’da erkenci kuru soğan hasadı başladı
 Şanlıurfa Karaköprü Anadolu İmam Hatip Lisesi öğrencilerinden ayvaza ziyaret
 Amasya Orman Bölge Müdürlüğü Personel Alıyor
 Elleri öpülesi annelerimizin ‘Anneler Günü’nü kutluyorum
 EFSANE GÖZ DOKTORU KADİR EKERCAN: AMASYA TABİPLER ODASI BAŞKANI SEÇİLDİ
 Amasya’nın Tek Kadın Kaymakamı Şeyma Şendur, Hamamözü’nde Görevini Tamamladı
 Amasya Arkeoloji Müzesi’nde Sıra Dışı Keşif: Müslüman Mumyaları Sergileniyor!